How to Build a GoHighLevel Workflow From Scratch (2026)
To build a GoHighLevel workflow from scratch, open the Automation tab, click Create Workflow, choose Start From Scratch, set your trigger (the event that starts the automation), add actions (what should happen next), enable Allow Multiple if needed, then publish. A basic workflow with three to five actions takes about 15 to 30 minutes for a beginner.
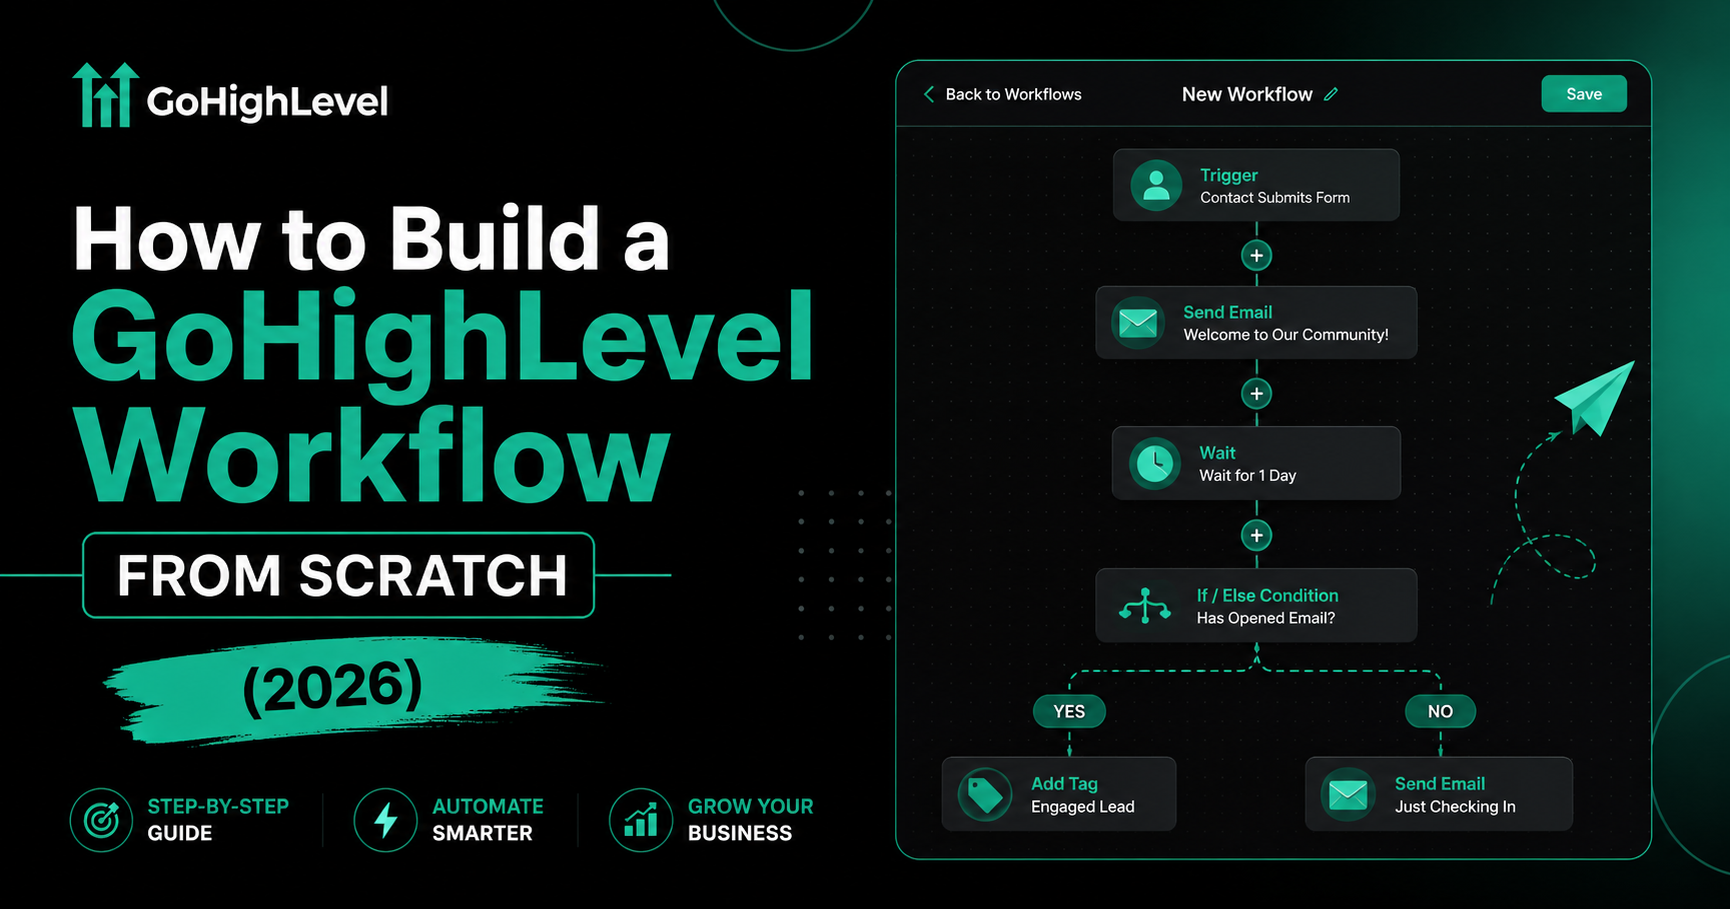
If you have ever opened the GoHighLevel automation builder and felt your eyes glaze over at the blank canvas, you are not alone. The workflow builder is the most powerful feature in HighLevel — and the one new users most often skip because it looks intimidating. The truth is that every GoHighLevel workflow is built from just two parts: a trigger (the event) and one or more actions (what happens next). Once you understand that pattern, you can build anything.
This guide walks you through building your first GoHighLevel workflow end to end, with screenshots, three real examples you can copy, and the most common settings beginners get wrong. By the end you will have a working automation in your account, not just theory.
What Is a GoHighLevel Workflow?
A GoHighLevel workflow is an automated sequence inside the HighLevel CRM that runs actions automatically when a trigger event happens. The trigger is the event that starts the workflow — for example, a form submission, a missed call, or an appointment being booked. The action is what the system does in response — for example, sending an SMS, adding a tag, creating a task, or moving the contact to a new pipeline stage.
Workflows replace the manual work that would otherwise eat your team’s day: chasing missed calls, sending appointment reminders, requesting reviews, nurturing leads who went cold. According to internal data from GHLWorkflow client builds, a single well-designed workflow saves the average agency 8 to 22 hours per week per client account.
Read this: How Agencies Scale with GoHighLevel: The 2026 Operational Playbook
What You Need Before You Start
Before you open the workflow builder, get these four things in order. Trying to build without them is the most common reason beginners abandon a workflow halfway through.
How to Build Your First GoHighLevel Workflow (Step-by-Step)
Follow these eight steps in order. Each one takes 1 to 5 minutes. By the end you will have a published workflow firing in your account.
Open the Workflow Builder
From your sub-account dashboard, click Automation in the left sidebar, then click the Workflows tab at the top. You’ll see a list of any existing workflows (or an empty state if it’s your first). Click the green + Create Workflow button in the top right.
Choose Start From Scratch
GoHighLevel will offer two options: Start From Scratch (recommended for learning) or Use a Recipe (pre-built templates). For your first workflow, choose Start From Scratch — it forces you to understand every piece. Once you know the basics, recipes save time on common patterns.
Name Your Workflow Clearly
Use a naming convention from day one. We recommend: [Function] – [Trigger] – [Outcome]. For example: ‘Lead Capture – Demo Form – SMS Confirmation’. When you have 40 workflows in 18 months, your future self will thank you.
Add Your Trigger
Click the + Add New Trigger button. You’ll see categories like Contact, Appointment, Form, Pipeline, Email, Calls, and more. For a beginner workflow, the most common triggers are:
Pick one, then narrow it with filters. For example, if you choose Form Submitted, add a filter for the specific form name. Without filters, the workflow will fire for every form on your site — almost certainly not what you want.
Add Your First Action
Click the + below the trigger and choose Add Action. Actions are grouped by category: Communication (SMS, Email, WhatsApp), Contact (add tag, remove tag, update field), Pipeline (move stage), Task, Conditional (if/else), Wait, and more. Pick the action you want to happen first.
If you chose Send SMS, write a clear, conversational message using custom values for personalization. Example:
Hey {{contact.first_name}}, thanks for requesting a demo! We’ve reserved a 30-minute slot for you. Reply YES to confirm or pick another time here: {{contact.calendar_link}}
Add Wait Steps Between Actions
Stacking three SMSs back-to-back will get your contact to mark you as spam. Always add a Wait step between communication actions. A 10-second wait between an SMS and a follow-up email is usually enough — for nurture sequences, use hours or days.
Configure the Settings Tab
Click the Settings tab at the top of the workflow. This is where most beginners trip up. The settings you need to verify:
| Setting | What it does |
| Allow Multiple | If ON, a contact can re-enter the workflow each time the trigger fires. If OFF, they enter only once. Turn ON for repeated events like form submissions; OFF for one-time nurtures. |
| Stop on Response | If ON, the workflow exits the moment the contact replies. Use ON for cold outreach; OFF for transactional sequences. |
| Time Window | Restricts when actions can fire (e.g., 9 AM to 6 PM only). Trigger still fires anytime, but actions wait. |
| Event Start Date / End Date | Limits the workflow to a specific date range. Useful for promotional campaigns. |
Publish and Test
Toggle the switch in the top right from Draft to Published. A workflow stuck in Draft will never fire — this is the #1 reason brand new workflows appear broken. Then click Test Workflow, pick a test contact, and watch the Execution Log to confirm every step ran.
Expert Tip: Always build a ‘kill switch’ tag into every nurture workflow. Add a final condition: ‘If contact has tag UNSUBSCRIBE, exit workflow.’ This single safeguard prevents the embarrassing scenarios where a contact gets a Tuesday morning sales SMS three weeks after they replied STOP. — Nina B. Paul, Lead Automation Strategist, GHLWorkflow
GoHighLevel Workflow Examples You Can Copy Today
Theory only goes so far. Here are three complete workflows our team builds for almost every client, in order of difficulty. Build the first one this afternoon — it pays for your GHL subscription in week one.
Example 1: Missed Call Text Back (Beginner — 5 minutes)
The single highest-ROI workflow in GoHighLevel. When someone calls your business and you don’t answer, the system immediately texts them back. Research from Salesforce shows that responding to a lead within five minutes makes you 21 times more likely to convert them than waiting 30 minutes.
- Trigger: Inbound Call → Filter: Call Status = Missed
- Action: Send SMS → ‘Hey {{contact.first_name}}, sorry we missed your call! Reply here or book a time: {{calendar_link}}’
- Action: Add Tag → ‘Missed Call Recovery’
- Action: Create Task → Assigned to sales rep
Example 2: Demo Confirmation + Reminder Sequence (Intermediate — 20 minutes)
Boost your demo show-rate from the typical 45% to 70%+ with a properly built reminder sequence.
- Trigger: Appointment Booked
- Action: Send SMS confirmation immediately
- Wait: Until 24 hours before appointment
- Action: Send SMS reminder + email
- Wait: Until 1 hour before appointment
- Action: Send final SMS with Zoom link
- Goal Event: Appointment status = Showed → Exit workflow
- If Goal not met: Send no-show recovery sequence
Example 3: Lead Magnet Delivery + Nurture (Advanced — 60 minutes)
This is the workflow that turns a lead magnet from a one-time email into a 21-day nurture machine that books strategy calls on autopilot.
- Trigger: Form Submitted (lead magnet form)
- Action: Add Tag → ‘Lead Magnet Downloaded’
- Action: Send Email → Deliver the asset (PDF, snapshot link, etc.)
- Wait: 1 day → Send Email 2 (story + soft pitch)
- Wait: 2 days → Send Email 3 (case study)
- Wait: 3 days → Send Email 4 (objection handler)
- Continue for 21 days, ending with strategy call CTA
- Conditional: If contact books call → exit and add ‘Booked Call’ tag
DIY vs Hire an Expert: Which Path Is Right for You?
| Factor | Build It Yourself | Hire a GHL Workflow Expert |
| Time to first working workflow | 1–4 hours (with this guide) | 24–72 hours (turnkey) |
| Cost | Free (included with GHL) | $300–$1,500 per workflow |
| Best for | Simple workflows, learning the platform | Complex multi-system builds, agency-scale automations |
| Risk | Bugs you may not spot for weeks | Tested before going live |
| Long-term value | You learn the platform deeply | You stay focused on running your business |
If your workflow involves more than three actions, conditional branches, or any kind of API integration, the math usually favors hiring a specialist. A botched workflow that messages 500 contacts the wrong way is far more expensive than the $1,000 you would have paid to have it done right.
Need a complex workflow built right the first time? Our team has built 500+ GoHighLevel workflows for agencies. We deliver tested, documented, ready-to-fire automations in 7–14 days with a fixed-price quote. [Book a free strategy call →]
5 Common Mistakes That Stop GoHighLevel Workflows From Firing
If you’ve built a workflow and it’s not triggering, the cause is almost always one of these five issues. We see them every week in client audits.
1. Workflow Left in Draft
The toggle in the top right must read Published in green. A Draft workflow will never fire, no matter how perfect the logic is. Check this first every single time.
2. Allow Multiple Is Off
By default, a contact can only enter a workflow once. If your lead magnet form runs the same workflow and a returning visitor submits twice, the second submission is silently ignored. Turn this ON for any workflow where contacts can repeat the trigger.
3. Filters Are Too Specific
If your trigger filter says ‘Form = Contact Form V2’ and you later rename the form to ‘Contact Form 2026,’ the workflow will silently break. Audit filters monthly.
4. Contact Marked Do Not Disturb (DND)
If a contact has the DND icon enabled, all SMS and email actions are blocked even when the workflow fires correctly. Check the contact record directly — the workflow will show as ‘completed’ but the messages never went out.
5. Missing Phone Number or Email
If your action is Send SMS but the contact has no phone number on file, GHL skips the action silently. Add an Email fallback or a ‘Has Phone Number’ filter at the start of the workflow.
For the full troubleshooting checklist, see our complete guide on why your GoHighLevel workflow is not triggering.
Read this: GoHighLevel Webhooks: How to Connect GHL to Any Third-Party App
Frequently Asked Questions
1. What is a GoHighLevel workflow?
A GoHighLevel workflow is an automated sequence inside the HighLevel CRM that runs actions automatically when a trigger event happens, such as a form submission, missed call, or appointment booking.
2. How long does it take to build a GoHighLevel workflow?
A basic workflow with three to five actions takes 15 to 30 minutes for a beginner. A multi-branch workflow with conditional logic and integrations typically takes 2 to 4 hours.
3. Do I need coding skills to build a GoHighLevel workflow?
No. GoHighLevel uses a visual drag-and-drop builder. Coding is only needed for advanced custom API integrations or webhooks, which are optional.
4. What is the difference between a trigger and an action in GoHighLevel?
A trigger is the event that starts a workflow (form submitted, tag added, missed call). An action is what the workflow does in response (send SMS, add tag, create task, send email). Every workflow needs at least one trigger and one action.
5. Can one contact enter a GoHighLevel workflow multiple times?
Only if the Allow Multiple setting is enabled in the workflow’s Settings tab. By default, a contact can enter each workflow only once to prevent spamming.
6. How much does a GoHighLevel workflow cost to set up?
Building it yourself is free as part of your GHL subscription. Hiring a workflow expert ranges from $300 to $1,500 per workflow depending on complexity. Full multi-workflow system builds typically range $2,500 to $10,000.